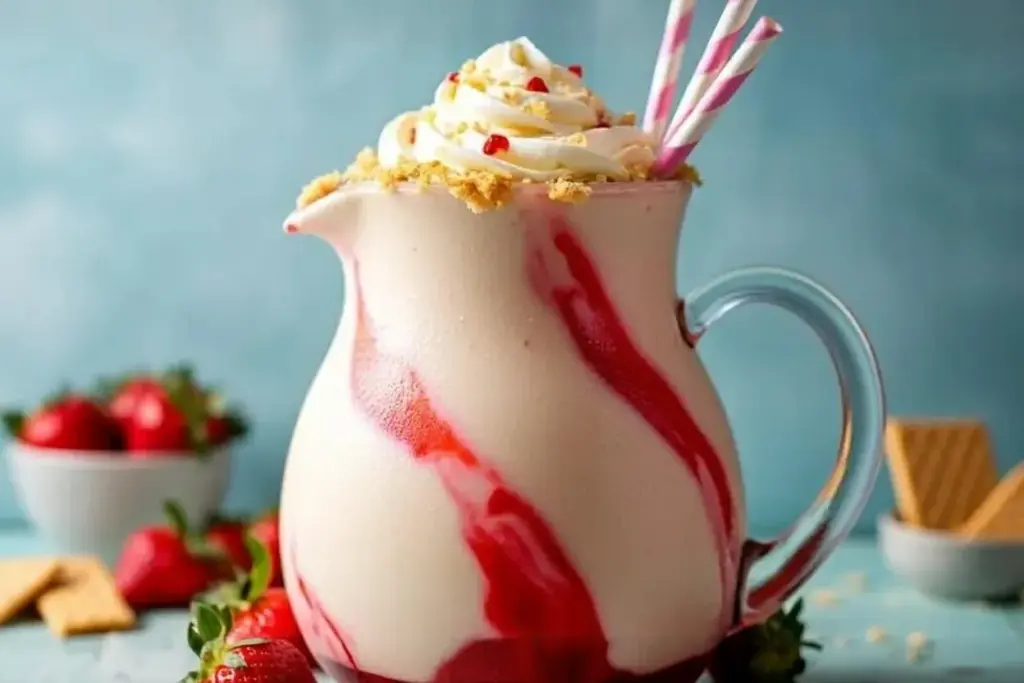
Let me tell you, the first time I whipped up this Dreamy Vanilla Strawberry Cheesecake Milkshake Delight, I was straight-up craving something sweet but didn’t want to turn my whole kitchen upside down. You know those afternoons when you’re standing in front of the fridge, hoping dessert will just magically appear? That’s exactly where I was—hungry for something cold, creamy, and just a little bit over the top. Well, this milkshake totally saved the day and, honestly, it’s become my go-to treat whenever I want to spoil myself (or impress friends with zero effort!).
This isn’t just any old milkshake. It’s got the best of all dessert worlds: the classic flavor of vanilla milkshake, the juicy punch of strawberries, and that rich, tangy cheesecake goodness all swirled into one frosty glass. If you love quick treats that taste like you spent hours making them (but actually only took about five minutes), you’re going to be obsessed. Seriously, the first sip is like summer, nostalgia, and dessert heaven all at once.
So, if you’re looking for something that’ll make you smile, is perfect for sharing (or not, I won’t judge!), and looks super cute in a tall glass—this Vanilla Strawberry Cheesecake Milkshake is about to be your new favorite. Grab your blender and let’s make something dreamy!
What’s the Story Behind This Dreamy Vanilla Strawberry Cheesecake Milkshake?
I first thought of making a milkshake like this after a birthday party where there was leftover strawberry cheesecake. Not enough for a whole slice, but too good to waste, you know? That’s when the lightbulb went off: what if I blended it with ice cream and milk? It was a total “aha!” moment, and honestly, I haven’t looked back.
Turns out, the combo of strawberries, vanilla, and cheesecake is nothing new—cheesecake has been a classic dessert for ages, and strawberry is basically its BFF. But making it into a milkshake? That’s where the fun comes in! Milkshakes have that nostalgia factor, reminding me of summer nights, old-school diners, and sharing something sweet with friends. Now, by adding real cheesecake flavors, it’s like getting the best of both worlds.
This drink is perfect for hot summer days, movie nights, or anytime you want to treat yourself. I’ve even made it for brunch get-togethers, and it’s always a hit. If you want something easy but impressive, or just need a little pick-me-up, this milkshake totally delivers. Plus, it’s a super cute pink color with swirls of cream—so it’s basically made for your Pinterest board (and your tastebuds!).
What Ingredients Will You Need for the Vanilla Strawberry Cheesecake Milkshake?
Let’s break down what makes this milkshake so darn special. I promise, nothing complicated—just simple, delicious stuff that comes together to make dessert magic.
- Vanilla Ice Cream: This is the creamy base and gives you that classic milkshake flavor. I go for a good-quality vanilla, but honestly, store brand works just fine. If you want things extra rich, grab French vanilla!
- Fresh Strawberries: They add a burst of fruity flavor and a pretty pink color. If strawberries aren’t in season, frozen ones work too—just thaw them a bit first.
- Cream Cheese: Here’s where the “cheesecake” comes in! Just a couple of spoonfuls make the shake tangy and decadent. I use regular cream cheese, but you can do low-fat if you want.
- Milk: This helps everything blend smoothly. I usually use whole milk for a richer texture, but any milk will do—almond, oat, or whatever you have on hand.
- Graham Crackers: Crushed graham crackers are the secret that gives you that real-deal cheesecake vibe. I like to sprinkle some on top for crunch, too!
- Vanilla Extract: Just a splash takes the flavor to the next level. It’s not absolutely necessary, but trust me, it makes a difference.
- Sugar (Optional): If your strawberries aren’t super sweet, add a little sugar or honey. Taste and adjust—no judgment here!
- Whipped Cream (for topping): It’s not required, but honestly, why not? A big swirl on top just makes it feel extra special.
If you don’t have graham crackers, shortbread cookies or digestive biscuits work great. And if you’re dairy-free, there are so many good vegan ice creams and cream cheese options out there now. I’ve tried this with oat milk and vegan cream cheese, and it’s still dreamy!
The best part is, you can mix and match based on what’s in your kitchen. Got blueberries instead of strawberries? Go for it. Want it extra thick? Add more ice cream. It’s all about making it your own.
Equipment & Tools You’ll Need
Don’t worry, you won’t need any fancy gadgets for this recipe. Here’s what I always grab:
- Blender: Any blender will do, as long as it can crush ice and blend everything smooth. I’ve even used an old hand-me-down one from my grandma and it worked fine.
- Measuring Cups & Spoons: Helpful for getting the ratios right, but honestly, I eyeball it sometimes and it still turns out great.
- Glasses or Mason Jars: For serving. Tall glasses make it look extra pretty (and Pinterest-worthy!).
- Spoon or Straw: To scoop up every last bit, especially those cheesecake-y swirls.
If you don’t have a blender, you can mash the berries and cream cheese really well and stir everything together by hand. It’ll be a bit chunkier, but still super tasty!
How to Make the Dreamy Vanilla Strawberry Cheesecake Milkshake Delight
- Prep Your Ingredients: Wash and hull your strawberries. If they’re big, halve them. Let your cream cheese soften a bit so it blends nicely. If you’re using frozen strawberries, just let them thaw for 5-10 minutes.
- Add to Blender: Toss in 2 cups vanilla ice cream, 1 cup sliced strawberries, 2 ounces cream cheese (about 2 heaping tablespoons), and 1/2 cup milk. Add 1/2 teaspoon vanilla extract, and 1-2 teaspoons sugar or honey if you want it sweeter.
- Blend Until Smooth: Pop the lid on and blend on high until everything is creamy and pink. If it’s too thick, splash in a little more milk. Too thin? Add a bit more ice cream.
- Add the Graham Crackers: Crumble 1-2 graham crackers and toss about half into the blender. Pulse just a few times to mix them in—you want some little bits left for that “crust” vibe.
- Taste and Adjust: Grab a spoon and taste. Need more tang? Add a touch more cream cheese. Want it sweeter? More sugar. You’re the boss!
- Pour and Top: Pour into tall glasses. Top with whipped cream, extra crushed graham crackers, and maybe a strawberry or two for that wow factor.
That’s it! Seriously, it’s that easy. If your blender gets stuck, stop and give it a stir or add a tiny bit more milk. Don’t over-blend or it’ll get runny—just blend until smooth and creamy. And if you want a thick, spoonable shake, start with less milk and add more as you go.
Tips & Tricks for the Dreamiest Milkshake
- Use slightly softened ice cream: It blends way easier and gives you that perfect creamy texture. If your ice cream is rock solid, let it sit out for 5 minutes first.
- Don’t skip the cream cheese: Even if you’re skeptical, it’s what makes this taste like real cheesecake. I tried it once without, and it just wasn’t the same!
- Fresh vs. frozen strawberries: Both work, but frozen ones make your shake extra frosty. Just let them thaw a bit or your blender might complain (mine sure did!).
- Pulse in the graham crackers: Don’t blend them too much—you want those little bits for texture. Once, I accidentally blended too long and lost that awesome cheesecake crust crunch.
- Tweak to taste: The best part of this recipe is how easy it is to adjust. More or less cream cheese, extra berries, more sugar—it’s all up to you!
- Make it ahead: You can blend everything but the graham crackers and keep it in the freezer for an hour or two. Just give it a quick blend again and add crackers right before serving.
Oh, and don’t forget to sneak a taste before serving—nobody will notice that spoonful missing, I promise!
Variations & Customizations
One of the best things about this Vanilla Strawberry Cheesecake Milkshake is how flexible it is. You can totally make it your own!
- Berry Swap: Try blueberries, raspberries, or even a mix! I once used a handful of mixed frozen berries when strawberries were out of season, and it was SO good.
- Dairy-Free: Use non-dairy vanilla ice cream, your favorite plant-based milk, and vegan cream cheese. It’s still rich and delicious—promise.
- Cookies Instead of Graham Crackers: Shortbread or digestive biscuits give a similar vibe. I’ve even crumbled up vanilla wafers in a pinch.
- Make it Boozy: For grown-ups, a splash of vanilla vodka or strawberry liqueur turns this into an epic dessert cocktail.
- Chocolate Drizzle: Add a swirl of chocolate syrup in the glass before pouring for a chocolate-strawberry twist.
- Extra Protein: Add a scoop of vanilla protein powder if you want to sneak a little boost in.
I love making a blueberry version for brunch—it’s like a milkshake and cheesecake all in one, but with a new fruity twist.
How to Serve and Store Your Milkshake
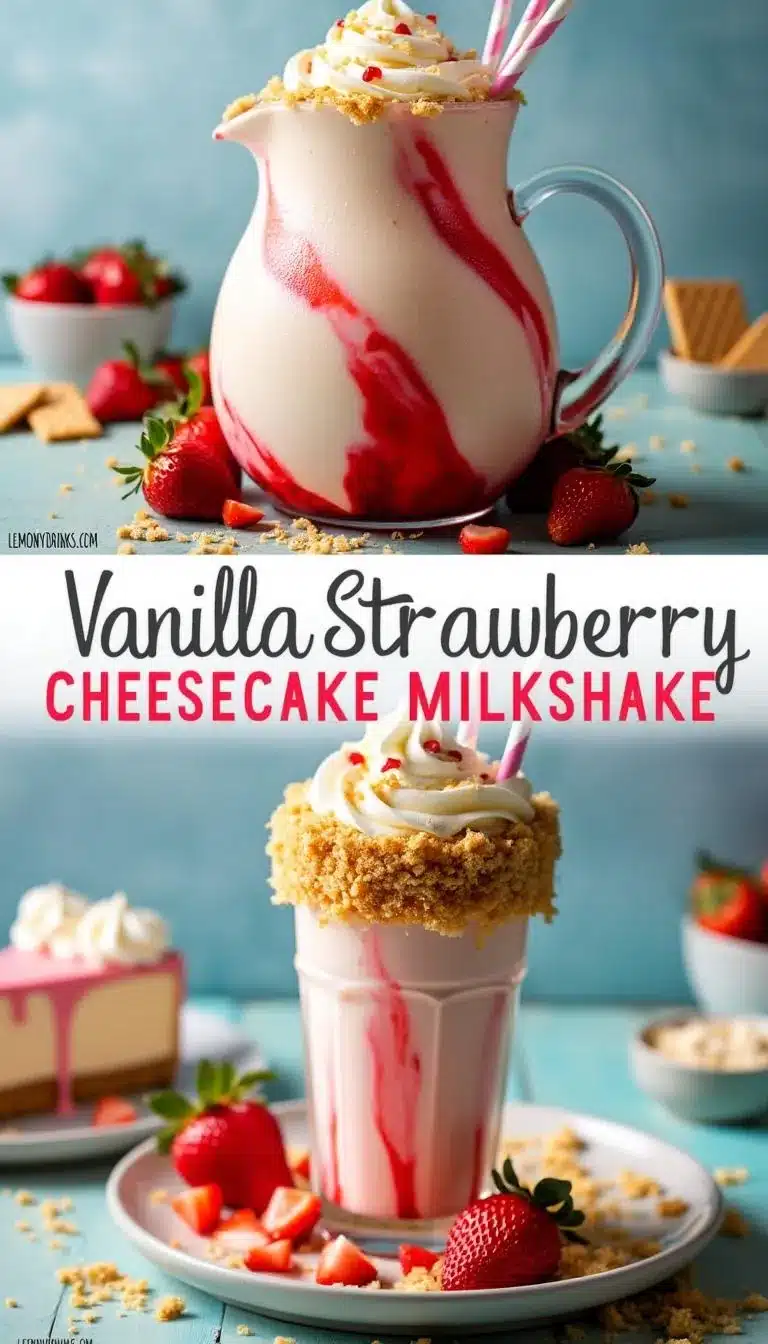
This milkshake is best served right away, super cold and creamy, in a tall glass or a cute mason jar. Top with lots of whipped cream, extra graham cracker crumbles, and maybe a fresh strawberry for that picture-perfect finish. If you’re feeling fancy, pop in a fun straw and snap a pic for your Pinterest board—you know you want to!
If you have leftovers (which, let’s be real, is rare), you can pop the milkshake in the freezer for a couple of hours. Just give it a quick blend or stir before serving to smooth it out again. It’ll keep for about 24 hours in the fridge, but it’s thickest and creamiest right after blending. If you want to reheat (for some wild reason!), just let it sit out for a while—don’t microwave it, or you’ll lose that dreamy texture.
Are There Any Health Benefits?
Okay, so this Vanilla Strawberry Cheesecake Milkshake is 100% a treat, but that doesn’t mean there aren’t a few good-for-you perks! Strawberries are packed with vitamin C and antioxidants, and if you use fresh fruit, you’re getting some real nutrition in there. If you want to cut down on sugar, use a lower-sugar ice cream or swap in honey. And there are awesome dairy-free options out there for folks with allergies or dietary preferences.
At the end of the day, it’s about balance—enjoy every sip, and don’t stress the details. Dessert should make you happy!
FAQs About the Dreamy Vanilla Strawberry Cheesecake Milkshake Delight
Can I use frozen strawberries instead of fresh?
Absolutely! Just let them thaw a bit so your blender doesn’t have to work overtime. Frozen berries actually make the shake even frostier and thick.
What kind of cream cheese should I use?
Regular full-fat cream cheese gives you the richest flavor, but you can use low-fat or even vegan cream cheese if you want. Just make sure it’s softened for easy blending.
Do I have to add the graham crackers?
Nope, but they really do give you that classic cheesecake vibe. If you don’t have any, try shortbread or digestive biscuits—or skip them entirely for a smooth shake.
How do I make the milkshake thicker or thinner?
For a thicker shake, add more ice cream or use less milk. For a thinner, sippable shake, just splash in a bit more milk until it’s the right consistency for you.
Can I make this milkshake ahead of time?
You totally can! Blend it up, then pop it in the freezer. Before serving, blend it again to get that creamy texture back and add graham crackers at the last minute for crunch.
So there you have it—one dreamy, easy, and totally delicious Vanilla Strawberry Cheesecake Milkshake you’ll want to make again and again. If you try it, let me know how it turns out! And don’t forget to snap a pic for your Pinterest board—this one’s a stunner! 🍓🍰🥤
Vanilla Strawberry Cheesecake Milkshake
This dreamy milkshake combines the classic flavors of vanilla, juicy strawberries, and tangy cheesecake in a frosty glass. It’s a quick, decadent dessert that’s perfect for hot days, movie nights, or anytime you want to treat yourself.
- Prep Time: 5 minutes
- Total Time: 5 minutes
- Yield: 2 servings 1x
- Category: Milkshake
Ingredients
- 2 cups vanilla ice cream
- 1 cup fresh strawberries, hulled and halved (or thawed frozen strawberries)
- 2 ounces cream cheese (about 2 heaping tablespoons), softened
- 1/2 cup whole milk (or any milk of choice)
- 1/2 teaspoon vanilla extract
- 1–2 teaspoons sugar or honey (optional, to taste)
- 1–2 graham crackers, crumbled (plus extra for topping)
- Whipped cream, for topping
Instructions
- Wash and hull the strawberries. If large, halve them. Let cream cheese soften for easier blending. If using frozen strawberries, thaw for 5-10 minutes.
- Add vanilla ice cream, strawberries, cream cheese, milk, vanilla extract, and sugar or honey (if using) to a blender.
- Blend on high until smooth and creamy. If too thick, add more milk; if too thin, add more ice cream.
- Add half of the crumbled graham crackers to the blender and pulse a few times to mix, leaving small bits for texture.
- Taste and adjust: add more cream cheese for tang or more sugar for sweetness as desired.
- Pour into tall glasses. Top with whipped cream, extra crushed graham crackers, and fresh strawberries if desired.
Notes
For a thicker shake, use less milk or more ice cream. Dairy-free and vegan options work well with plant-based ice cream, milk, and cream cheese. Pulse graham crackers briefly for texture. Make ahead by blending all but graham crackers and freezing; re-blend and add crackers before serving.
Nutrition
- Serving Size: 1 tall glass (about 12 ounces)
- Calories: 420
- Sugar: 40
- Sodium: 220
- Fat: 22
- Saturated Fat: 13
- Carbohydrates: 50
- Fiber: 2
- Protein: 7
Keywords: strawberry cheesecake milkshake, vanilla milkshake, easy dessert, summer drink, creamy milkshake, quick milkshake recipe, blender dessert, strawberry milkshake, cheesecake shake