“You’ve got to see this punch bowl,” my friend Lisa said, holding her phone up with a grin that I instantly recognized as ‘you won’t regret trying this.’ The photo was this wild swirl of blue and gold lemonade layers, looking like something straight out of a summer party magazine. Honestly, I was skeptical at first—layered drinks always seemed like a fancy, complicated thing best left to bartenders. But then she told me it was surprisingly simple and perfect for a crowd. That weekend, I gave it a shot with some leftover lemonade and a splash of blue curaçao syrup I’d tucked away for months.
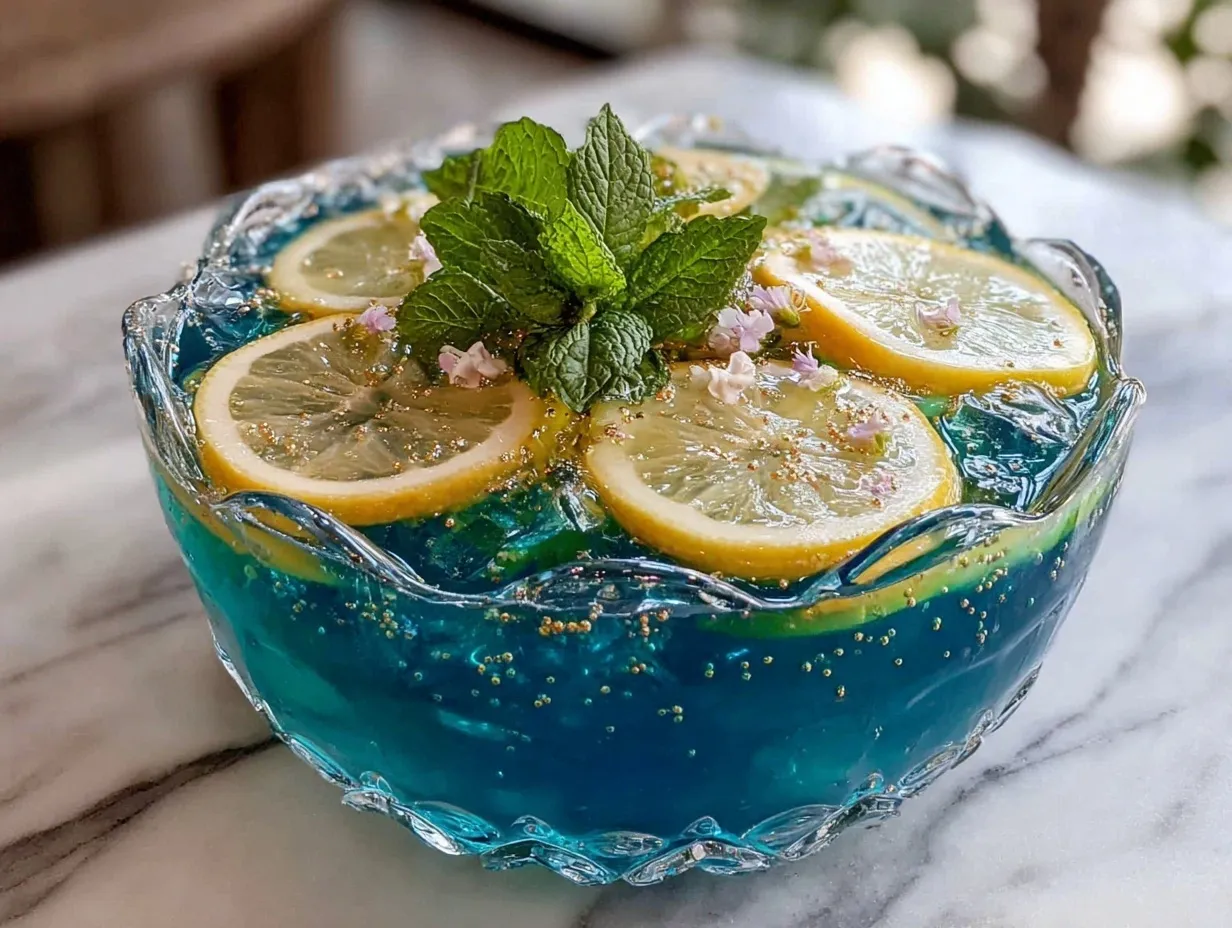
What happened next was kind of magical. The punch bowl didn’t just look stunning; it was refreshing, bright, and exactly the kind of cool-down I needed after a long day of errands and summer heat. The layers held together with just the right touch, and as people dipped their glasses in, the colors swirled with every pour. It turned out this Refreshing Blue and Gold Layered Lemonade Punch Bowl wasn’t just a pretty drink—it became the unofficial star of my summer gatherings.
Now, I find myself making it every week, sometimes tweaking it with a little fizz or a hint of mint. It’s simple enough to pull off last minute but impressive enough to make anyone ask for the recipe. The way those blue and gold layers catch the light in the afternoon sun? Honestly, it’s little moments like that that make me keep coming back to this punch bowl. No fuss, no nonsense, just pure summer joy in a glass.
Why You’ll Love This Recipe
After several rounds of testing (and plenty of happy guests), I can say this punch bowl recipe hits all the marks for a summer party drink you’ll want to make again and again. Here’s why it stands out:
- Quick & Easy: Ready in under 15 minutes—perfect for last-minute plans or those hectic weekday evenings when you want something cool and tasty.
- Simple Ingredients: You don’t need a long grocery list or obscure syrups. Most ingredients are pantry staples or easy to find at your local store.
- Perfect for Summer Parties: Whether it’s a backyard BBQ, a pool day, or a casual get-together, this punch bowl brings a festive vibe without the fuss.
- Crowd-Pleaser: Both kids and adults love it—sweet but not too sweet, with a tart finish that keeps everyone coming back for more.
- Visually Stunning: The layered effect is not just eye candy; it’s a conversation starter. It’s the kind of drink where guests pause to admire before they sip.
What makes this recipe different from the rest? It’s all about the layering technique and the balance of flavors. The blue lemonade layer uses a lightly sweetened syrup that’s just the right weight to float beautifully on top of the golden classic lemonade beneath. No need for special tools or complicated steps—just patience and a steady hand. Plus, the recipe is versatile enough to be tweaked for an adult version by adding a splash of vodka or gin.
This punch bowl isn’t just a drink—it’s a small celebration in a bowl, perfect for those moments when you want something easy but memorable. And honestly? It’s become my go-to refreshment when the heat is on and company is near.
What Ingredients You Will Need
This recipe uses simple, wholesome ingredients to deliver bold flavor and that satisfying layered look without any hassle. Most of these are pantry basics, and substitutions are easy if you want to customize.
- For the Gold Lemonade Layer:
- Fresh lemon juice (about 1 cup or 240 ml) – Provides the bright, tangy base
- Granulated sugar (¾ cup or 150 g) – Balances tartness; can swap with honey or agave syrup
- Cold water (4 cups or 950 ml) – Dilutes to perfect lemonade strength
- Ice cubes – To chill and keep the layer distinct
- For the Blue Lemonade Layer:
- Blue curaçao syrup or blue sports drink (1 cup or 240 ml) – Gives that vibrant blue color; for a non-alcoholic version, blue raspberry syrup works great
- Fresh lemon juice (½ cup or 120 ml) – Keeps the tartness consistent
- Cold water (1½ cups or 350 ml) – Lightens the syrup for layering
- Ice cubes (optional, use sparingly to avoid mixing layers)
- Garnishes (Optional but recommended):
- Lemon slices – Adds a fresh citrus note and visual appeal
- Fresh mint sprigs – For a cool aroma and color contrast
- Edible gold glitter or gold sugar crystals – If you want to amp up the golden vibes
For best results, I recommend using freshly squeezed lemon juice—it makes a world of difference in brightness and flavor. I tend to go with Simply Lemonade brand if I’m in a pinch for premade lemonade. For the blue layer, something like Torani Blue Curaçao Syrup has just the right sweetness and color intensity. If you want to keep things alcohol-free but still striking, blue raspberry syrup from your local grocery is a handy option.
Looking for a twist? Swap cold green tea for the water in the gold layer for a subtle herbal note. In summer, frozen lemon slices work great to keep the punch chilled without watering it down as much.
Equipment Needed
- Large punch bowl (at least 3-quart/3-liter capacity): A clear glass bowl works best to showcase the layers. I once used a plastic bowl, and while it worked, the colors didn’t pop as well.
- Measuring cups and spoons: Accuracy helps keep the layering effect sharp, especially with the syrup and lemon juice ratios.
- Mixing pitchers or bowls: Separate containers for making each lemonade layer so you don’t mix colors prematurely.
- Long spoon or ladle: For gently pouring the blue layer over the gold without disturbing it. I prefer a ladle with a narrow spout for more control.
- Citrus juicer (manual or electric): Fresh lemon juice is key here, so a good juicer saves time and effort.
If you don’t have a punch bowl, a large glass beverage dispenser with a spigot works well, too—just be careful with layering as the spigot can mix things up. Budget-friendly measuring cups and a basic ladle from the dollar store can get the job done without breaking the bank.
Preparation Method
- Prepare the Gold Lemonade: In a large pitcher, combine 1 cup (240 ml) freshly squeezed lemon juice with ¾ cup (150 g) granulated sugar. Stir well until the sugar dissolves completely. Add 4 cups (950 ml) cold water and mix. Taste and adjust sweetness if needed. Chill in the refrigerator for about 10 minutes.
- Fill the Punch Bowl: Pour the chilled gold lemonade gently into your punch bowl, filling it about two-thirds full. Add a few ice cubes carefully—don’t overdo it, or the layering gets messy. Let it settle for 5 minutes so the temperature evens out.
- Make the Blue Lemonade Mixture: In a separate pitcher, combine 1 cup (240 ml) blue curaçao syrup or blue raspberry syrup with ½ cup (120 ml) fresh lemon juice and 1½ cups (350 ml) cold water. Stir gently to blend.
- Layer the Blue Lemonade: Here’s the trick: Using a ladle, slowly pour the blue lemonade over the back of a large spoon held just above the gold lemonade surface. This helps the blue layer float rather than mix in. Pour steadily and patiently—this step takes a little finesse but no rocket science.
- Add Garnishes: Float lemon slices and mint sprigs on top for that fresh, inviting look. If you’re feeling festive, sprinkle edible gold glitter or sugar crystals for extra sparkle.
- Serve Immediately: Provide glasses and a ladle so guests can scoop the layered lemonade without stirring too much. You’ll notice the blue and gold swirl as the punch is served, keeping the visual magic going.
Pro tip: If your layers start to mix, it’s usually because the liquids are too similar in density or temperature. Chill both mixtures well, and pour slowly over a spoon. Also, avoid stirring once layered unless you want a pretty swirl effect.
Cooking Tips & Techniques
Layering drinks is honestly part art, part science. I learned the hard way that patience is everything. Pour too fast and the layers blend—too slow and the blue might start to chill and thicken, making pouring harder.
- Temperature matters: Both lemonade layers should be cold but not icy. Chilling for at least 10 minutes helps the liquids maintain their density difference.
- Pour over a spoon: This technique slows the flow and diffuses the blue lemonade gently onto the gold layer.
- Density differences: Syrups are heavier, so diluting the blue syrup with water is key to making it float instead of sinking.
- Ice cubes placement: Adding ice to the bottom layer before pouring the top helps keep the separation but avoid ice in the top layer or it will mix quickly.
- Practice makes perfect: I’ve made this punch bowl a dozen times now, and small tweaks—like adjusting syrup concentration or lemon juice ratio—make a noticeable difference.
- Multitasking: While chilling the lemonades, prep garnishes or set out glasses to streamline serving.
- Common mistake: Stirring after layering—try to resist the urge unless you want a blended color rather than layers.
Variations & Adaptations
This punch bowl recipe is a great jumping-off point to make your own version:
- Adult Twist: Add 1 to 2 cups (240–480 ml) of vodka, gin, or white rum to the gold lemonade layer for a spirited summer sipper.
- Herbal Infusion: Muddle fresh mint or basil leaves in the gold lemonade before layering to add an aromatic note without overpowering the citrus.
- Fruit Swaps: Replace the blue syrup with a blueberry or blackberry syrup for a more natural flavor and color.
- Low-Sugar Option: Use a sugar substitute like stevia or monk fruit in the lemonade layers to make it diet-friendly.
- Sparkling Version: Swap half of the water in each layer for sparkling water or club soda for a fizzy punch bowl that’s extra refreshing.
- Seasonal Adaptation: In fall, try layering apple cider with a cinnamon syrup for a warm twist—similar to the vibes in the maple bourbon cider recipe I adore.
Personally, I once added a splash of elderflower liqueur to the blue layer for a floral note that surprised and delighted my guests. Don’t be afraid to experiment with what’s in your pantry or bar.
Serving & Storage Suggestions
Serve this punch bowl chilled, ideally right after assembling to keep those layers crisp and distinct. It looks fabulous when placed on a sunny patio table, catching the light and inviting guests to grab a glass.
Pair it with light summer bites like grilled shrimp skewers, fresh fruit platters, or even the tangy flavor of a classic margarita recipe to keep the citrus theme alive.
If you need to store leftovers, cover the punch bowl with plastic wrap and refrigerate for up to 24 hours. Fair warning—the layers will start to blend, but the taste stays delightful. Re-stir before serving or pour into individual ice-filled glasses to revive the chill.
Reheating isn’t recommended, but if you want to keep flavors fresh, add a few fresh lemon slices and mint sprigs before serving again. The flavors tend to mellow and deepen overnight, so it’s great for prepping ahead and letting guests enjoy a slightly softer version.
Nutritional Information & Benefits
This lemonade punch bowl is a light, refreshing option with about 90 calories per serving (8 oz/240 ml), mainly from natural sugars in lemon juice and syrup. It’s gluten-free and can be made vegan by using plant-based sweeteners.
The fresh lemon juice packs a dose of vitamin C and antioxidants, which can help with hydration and immune support—perfect for summer days when you’re outside soaking up the sun.
By controlling the sugar level, you can keep this drink balanced and avoid that overwhelming sweetness. Plus, if you add sparkling water, you cut calories further and add satisfying bubbles without compromising flavor.
Conclusion
This Refreshing Blue and Gold Layered Lemonade Punch Bowl is the kind of recipe that feels like a small party in itself. It’s approachable, visually stunning, and genuinely delicious—a rare combo that’s tough to find in summer drinks.
I’ve found that it works just as well for last-minute hosting as it does for planned celebrations. Changing up the syrup or adding a splash of spirit makes it your own, and honestly, it’s a recipe that keeps guests curious and coming back for more.
Give it a try, and don’t hesitate to share how you made it yours. I’m always excited to hear about new twists and personal touches!
Wishing you many sunny days with glasses full of this cool, layered delight.
FAQs
How do I keep the layers from mixing?
Make sure both lemonade layers are chilled and pour the top layer slowly over the back of a spoon. Adding ice cubes only to the bottom layer also helps maintain separation.
Can I make this punch bowl ahead of time?
You can prepare the lemonade layers separately and chill them, then assemble just before serving. Storing the finished punch too long causes layers to blend.
Is there an alcohol-free version?
Absolutely! Just skip any spirits and use blue raspberry syrup or blue curaçao syrup (non-alcoholic) for the blue layer.
Can I use other citrus juices?
Lemon juice is best for the classic tartness, but you can experiment with lime or a mix of lemon and orange juice for a different flavor profile.
What’s a good alternative if I don’t have blue curaçao syrup?
Blue raspberry syrup or blueberry syrup work great as non-alcoholic color alternatives and add a fruity twist to the punch.
Pin This Recipe!
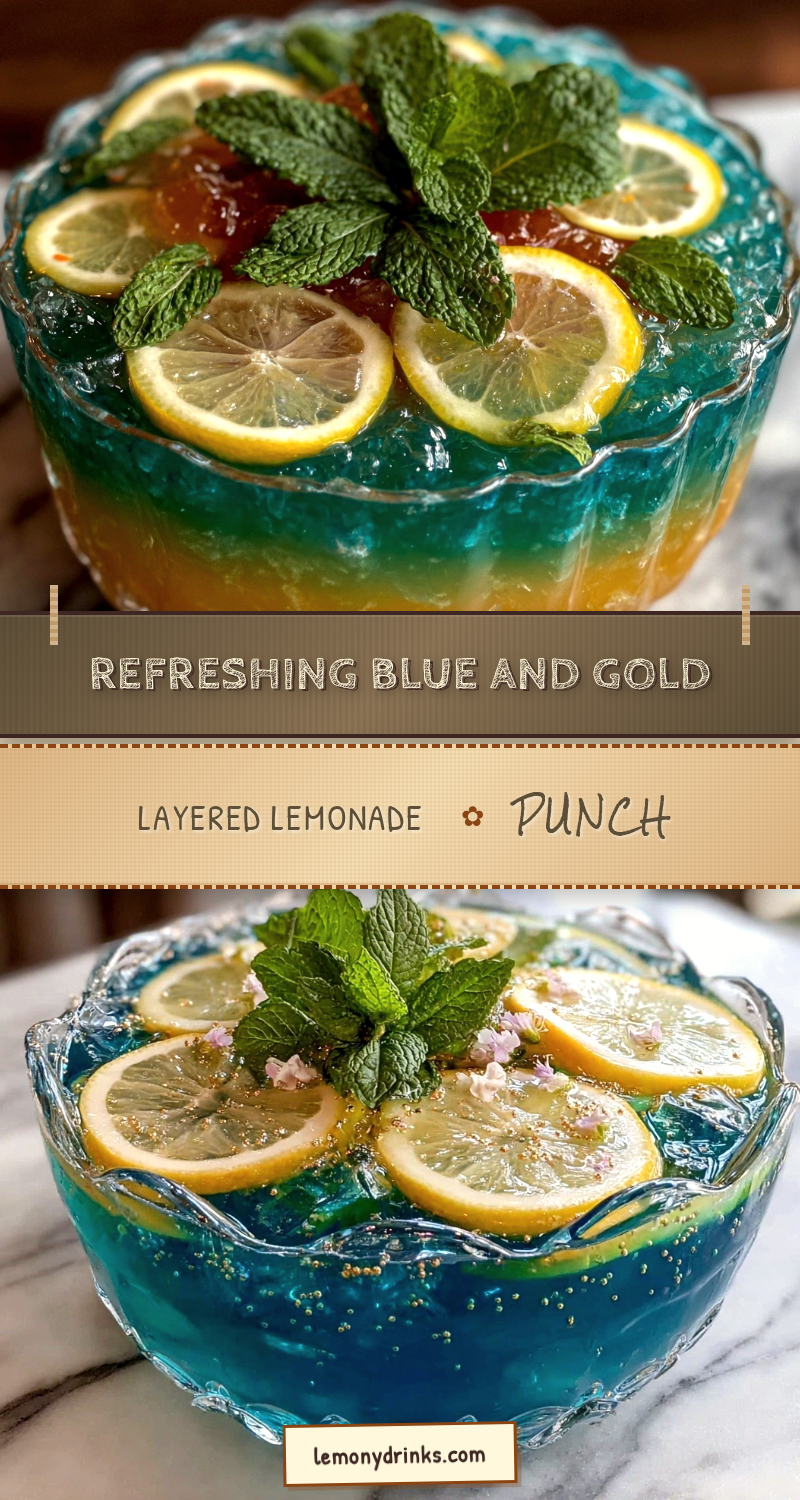
Refreshing Blue and Gold Layered Lemonade Punch Bowl

A visually stunning and refreshing layered lemonade punch perfect for summer parties, easy to make with simple ingredients and a layering technique that impresses guests.
- Prep Time: 10 minutes
- Cook Time: 0 minutes
- Total Time: 10 minutes
- Yield: 8 servings 1x
- Category: Beverage
- Cuisine: American
Ingredients
- For the Gold Lemonade Layer:
- 1 cup (240 ml) fresh lemon juice
- ¾ cup (150 g) granulated sugar
- 4 cups (950 ml) cold water
- Ice cubes
- For the Blue Lemonade Layer:
- 1 cup (240 ml) blue curaçao syrup or blue raspberry syrup
- ½ cup (120 ml) fresh lemon juice
- 1½ cups (350 ml) cold water
- Optional ice cubes (use sparingly)
- Garnishes (optional):
- Lemon slices
- Fresh mint sprigs
- Edible gold glitter or gold sugar crystals
Instructions
- Prepare the Gold Lemonade: In a large pitcher, combine 1 cup (240 ml) freshly squeezed lemon juice with ¾ cup (150 g) granulated sugar. Stir well until the sugar dissolves completely. Add 4 cups (950 ml) cold water and mix. Taste and adjust sweetness if needed. Chill in the refrigerator for about 10 minutes.
- Fill the Punch Bowl: Pour the chilled gold lemonade gently into your punch bowl, filling it about two-thirds full. Add a few ice cubes carefully—don’t overdo it, or the layering gets messy. Let it settle for 5 minutes so the temperature evens out.
- Make the Blue Lemonade Mixture: In a separate pitcher, combine 1 cup (240 ml) blue curaçao syrup or blue raspberry syrup with ½ cup (120 ml) fresh lemon juice and 1½ cups (350 ml) cold water. Stir gently to blend.
- Layer the Blue Lemonade: Using a ladle, slowly pour the blue lemonade over the back of a large spoon held just above the gold lemonade surface. Pour steadily and patiently to allow the blue layer to float rather than mix in.
- Add Garnishes: Float lemon slices and mint sprigs on top for a fresh look. Sprinkle edible gold glitter or sugar crystals if desired.
- Serve Immediately: Provide glasses and a ladle so guests can scoop the layered lemonade without stirring too much.
Notes
Chill both lemonade layers well before layering to maintain separation. Pour the blue layer slowly over the back of a spoon to prevent mixing. Add ice cubes only to the bottom layer to keep layers distinct. Avoid stirring after layering unless a swirl effect is desired. Variations include adding alcohol, using sparkling water, or swapping syrups for different flavors.
Nutrition
- Serving Size: 8 oz (240 ml)
- Calories: 90
- Sugar: 22
- Sodium: 5
- Carbohydrates: 23
Keywords: lemonade punch, layered drink, summer party drink, blue curaçao, non-alcoholic punch, refreshing beverage, summer punch bowl